BAckground


SgxSpectre Attack Can Extract Data from Intel SGX Enclaves

A new variation of the Spectre attack has been revealed this week by six scientists from the Ohio State University. Named SgxSpectre, researchers say this attack can extract information from Intel SGX enclaves.

Intel Software Guard eXtensions (SGX) is a feature of modern Intel processors that allow an application to create so-called enclaves. This enclave is a hardware-isolated section of the CPU's processing memory where applications can run operations that deal with extremely sensitive details, such as encryption keys, passwords, user data, and more.

The Meltdown and Spectre attacks revealed at the start of the year allowed an attacker to break the isolation between OS and apps, and the inter-app isolation, permitting a malicious attacker to retrieve information from the OS kernel or from other apps.

SgxSpectre attacks code patterns in SGX SDKs
But neither Meltdown and Spectre were able to extract data from SGX enclaves. This is where SgxSpectre comes in.

According to researchers, SgxSpectre works because of specific code patterns in software libraries that allow developers to add SGX support to their apps. Vulnerable SGX development kits include the Intel SGX SDK, Rust-SGX, and Graphene-SGX.

Academics say an attacker can leverage the repetitive code execution patterns that these SDKs introduce in SGX enclaves and watch for small variations of cache size. This is a classic "side-channel attack," and is quite effective.

"SgxPectre Attacks can completely compromise the confidentiality of SGX enclaves," researchers say. "[B]ecause vulnerable code patterns exist [...] and are difficult to be eliminated, the adversary could perform SgxPectre Attacks against any enclave programs."

"Because there are vulnerable code patterns inside the SDK runtime libraries, any code developed with Intel's official SGX SDK will be impacted by the attacks. It doesn't matter how the enclave program is implemented," the research team says.

Updates coming for the Intel SGX SDK
Intel's recent Spectre patches don't necessarily help, as an attacker can work around these fixes. Intel says an update for the Intel SGX SDK that adds SgxSpectre mitigations will be released on March 16.

App developers will need to integrate this new SDK version into their SGX-capable apps and issue an update to users.

Apps that implement Google's Retpoline anti-Spectre coding techniques are safe, researchers say.

Below is a video demo the team recorded for the SgxSpectre attack. Proof-of-concept code is available on GitHub, while copies of the team's research paper —titled "SgxSpectre: Attacks: Leaking Enclave Secrets via Speculative Execution"— can be downloaded from here and here.


Besides SgxSpectre, researchers also revealed two new variations of Meltdown and Spectre —named MeltdownPrime and SpectrePrime, respectively.

These new attacks are detailed in a research paper named "MeltdownPrime and SpectrePrime: Automatically-Synthesized Attacks Exploiting Invalidation-Based Coherence Protocols." These two attacks also serve to leak data from the kernel and other apps, but with other methods and a little bit faster.

Do you want to get rid of annoying and repeating ads on Saavn.com ?

NOTE: Works only on Google Chrome browser.

Saavn.com is a good website to stream music in India, but ads on the site reduces the fun and performance.
Lets stop ads on this website :D.

Create a folder “SaavnAdBlocker” on your machine anywhere, let’s say on “D”drive D:\
Create two files with following names and content.

block.js

//block.js
(function(){
 setTimeout(function(){ 
 var scr = document.createElement('script');
 scr.textContent = 'console.log(AdRotation); for(var key in AdRotation){ if(AdRotation.hasOwnProperty(key) && typeof AdRotation[key] == "string"){ AdRotation[key] = ""; } } AdRotation.adRotationTime *= 10000; AdRotation.slotDuration *= 10000; AdRotation.timerInterval *= 10000; console.log(AdRotation);'; 
 (document.head || document.documentElement).appendChild(scr); 
 }, 5000);
})();
 manifest.json

{
       "name": "SaavnAdBlocker",
       "description": "SaavnAdBlocker",
       "version": "1.0",
       "manifest_version": 2,
       "content_scripts": [
      {
              "matches": ["http://www.saavn.com/*"],
              "run_at": "document_end",
              "js": ["block.js"]
      }
   ]
}
1. Now open URL in Google Chrome: chrome://extensions/
2. Click on “Load unpacked extension..” button
3. A pop-up will ask you to select a folder
4. Now select the folder you just created and hit “ok” button
5. Your extension is loaded.
6. Now start Saavn.com, and enjoy without ads

Chrome is not allowing me to change default search engine !

It is very common that when you download any software from unreliable sources then they may change/harm your PC or laptop.Recently ,I was downloading  Adobe Photoshop's crack version from some website .I download one exe file and when I install it suddenly my chrome opened and I see many unwanted extensions are installed .I have removed them by following step

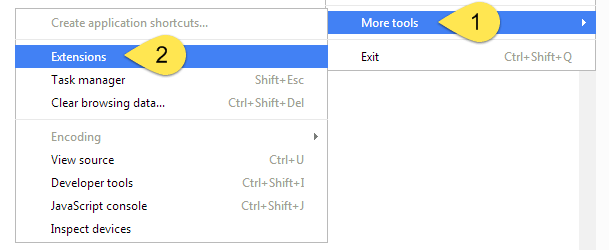
Step 1 :- Click on three dots in upper right corner .

Google customize and control icon


Step 2 :- Select More tools

Step 3:- Select extensions from side menu

extensions menu chrome

Step 4 :- Click on trash button to remove that extension from your computer .


delete chrome extension option


Congratulations !!! You are done now !


  • If you can not change your default search engine , then you can follow this some easy steps .


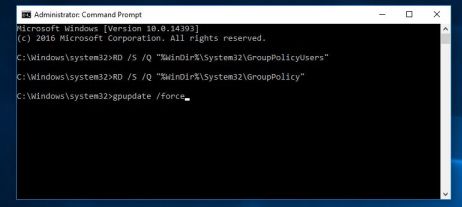
Step 1 :- Open cmd as an administrator mode .

Step 2 :- Type then following command .


  • Type 1 --

rd /S /Q "%WinDir%\System32\GroupPolicyUsers"


  • Type 2 --
rd /S /Q "%WinDir%\System32\GroupPolicy"

  • Type 3 --
                The “This setting is enforced by your administrator” policy will now be removed from Google Chrome, and you should be able to change your default search engine.

gpupdate /force

Reset Group policy Windows
CMD


Note :- Now please restart your browser . Enjoy !


What to Do about “Office Not Genuine" Messages

If you are a legitimate user and you receive this message in error, there are ways to fix it, quickly and easily. Here's how...

Microsoft Office Genuine Advantage (OGA) Notification
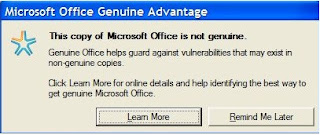
Are you receiving the "this copy of microsoft office is not genuine" message and does the following notification appear every time you open Word or another Office application?

Windows XP/Vista


 this copy of office is not genuine

Windows 7
this copy of microsoft office is not genuine

Clicking on 'Go online and resolve now' or 'Learn More' opens a website that explains why you see this message, but it offers no real information on how to rectify the issue. You can click on the Remind Me Later button, but if you click this button, an icon will be placed in the Windows notification area. If you double click this button it will show more information about the error message and offer solutions on how to validate your copy.

When you receive this notification you have two possible options, you could uninstall Office from your computer or purchase a license online from the Microsoft website. If you are using a counterfeit or pirated copy of the software, you should follow one of the above mentioned steps.

It is possible that legitimate users, with legal copies of the software, could still receive this notification, and in a situation such as this there are other ways to solve the issue. The notification you receive is triggered by an application that is installed on your computer, but the application will not prevent the software from functioning, or from being used. You should still be able to use all the features of Office, and get updates from Microsoft, but the notification message can become annoying in time. If you are a legitimate Office user, and need to rid yourself of this annoying notification trying the steps below could help to resolve the issue.

Windows XP & Windows Vista
Method 1

1. Save your work and close all the open Office applications

2. Navigate to the following Windows folder: C:\Windows\System32 for Windows XP or C:\Windows\SysWow64 for Windows Vista.

3. Find the following files (You can use CTRL+F to make the search easy) and delete them:

OGAAddin.dll
OGAVerify.exe
Method 2

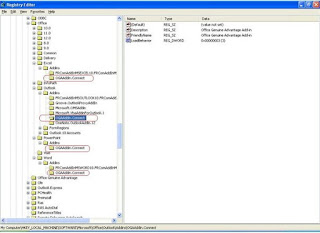
1. Open Windows RUN dialog (Press Win Key + R), enter “regedit" (without quotes) and hit Enter.

2. Navigate to the following registry key paths:

HKEY_LOCAL_MACHINE\SOFTWARE\Microsoft\Office\Powerpoint\Addins
HKEY_LOCAL_MACHINE\SOFTWARE\Microsoft\Office\Excel\Addins
HKEY_LOCAL_MACHINE\SOFTWARE\Microsoft\Office\Outlook\Addins
HKEY_LOCAL_MACHINE\SOFTWARE\Microsoft\Office\Word\Addins

3. Expand each of the above registry paths and delete OGAAddin.connect.OGAADIN-Connect


Windows 7
1. Open C:\Windows\System32 or C:\Windows\SysWow64

2. When you’re there, find the following files (Use CTRL+F to search for the files):

OGAEXEC
OGAAddin.dll
OGACheckControl.dll

3. Delete all of these files.

Note: You can rename the files instead of deleting them. It is recommended because if anything goes wrong you can undo any changes by restoring the original file names.


Another  Method :
Uninstall the KB949810 update
Step 1: Open Windows Search and search for OGANotifier.cab
Step 2: Once it has shown, extract its content with WinRar or similar software.
Step 3: Right-click on the OGANotifier.msi file and choose Uninstall.
Step 4: Finally, turn off Windows update so that the same notification program can not install on your computer again.

You are done and no more that bothering notification message will appear again. Note however that it is bad to use pirated software. If you are using unlicensded Office software you should then buy a license from Microsoft website.
This is how to fix the Microsoft Office not genuine problem. So if you were seeking information on how the Microsoft Word not genuine problem can be fixed.

Either of the above mentioned methods can be used to remove/disable the Office Genuine Advantage notifications that say this copy of Office is not genuine, but if you choose to implement these methods, you should disable Windows Auto-update. This will prevent the notification application from being installed again.

How to Dual-Boot Two (or More) Versions of Windows


Computers normally have a single operating system installed on them, but you can dual-boot multiple operating systems. You can have two (or more) versions of Windows installed side-by-side on the same PC and choose between them at boot time.
Typically, you should install the newer operating system last. For example, if you want to dual-boot Windows 7 and 10, install Windows 7 and then install Windows 10 second. However, this may not always be necessary — installing Windows 7 after Windows 8 or 8.1 seems to work.

The Basics

The process for creating a dual-boot system is similar no matter what operating system you’re dual-booting with. Here’s what you’ll need to do:
·    Install the First Version of Windows: If you already have a single Windows system installed on your computer, that’s fine. If not, install Windows normally. You may want to use custom partitioning settings and leave free space available on your hard drive for the second version of Windows.
·    Make Room For the Second Version of Windows: You’ll need available hard drive space for the next version of Windows. If you have Windows installed, you can resize the partition. You could also insert a second hard drive into your computer (if it’s a desktop computer) and install the second version of Windows to that hard drive.
·    Install the Second Version of Windows: Next, you’ll install the second version of Windows. Ensure you choose the “Custom Install” option, not the “Upgrade” option. Install it alongside the previous version of Windows, in a different partition on the same disk or on a different physical disk.
You’ll then be able to choose which copy of Windows you want to boot at boot time, and you can access the files from each version of Windows on the other one.
Install the First Version of Windows, If It’s Not Already Installed
Install the first version of Windows on your PC, assuming it’s not already installed. If your computer already has Windows installed on it, that’s fine. If you’re installing Windows fresh, you’ll want to choose the “Custom install” option when going through the installation wizard and create a smaller partition for Windows. Leave enough space for the other version of Windows. This means you won’t have to resize partitions later.


Shrink Your Windows Partition

 You’ll now need to shrink your existing Windows partition to make room for the second copy of Windows. If you already have enough free space or you’re installing the second copy of Windows to a different hard disk entirely and it has available space, you can skip this.

 -> Basically, this involves booting the existing Windows system on your computer and opening the Disk Management tool. (Do this by pressing Windows Key + R, typing diskmgmt.msc into the Run dialog, and pressing Enter.) Right-click the Windows partition and select the “Shrink Volume” option. Shrink it to make enough space for the other Windows system.

 -> If you’re using BitLocker encryption on your Windows system, you’ll first need to open the BitLocker Control Panel and click the “Suspend Protection” link next to the partition you want to resize. This will disable BitLocker encrpytion until you next reboot, and you’ll be able to resize the partition. Otherwise, you won’t be able to resize the partition.


Install the Second Version of Windows

Where to Download Windows 10, 8.1, and 7 ISOs Legally

Next, insert the installation media for the second version of Windows you want to install and reboot your computer. Boot it and go through the installer normally. When you see the “Upgrade” or “Custom install” option, be sure to select “Custom” — if you select Upgrade, the second version of Windows will install over top of your first version of Windows.


Select the “unallocated space” and create a new partition on it. Tell Windows to install itself to this new partition.  Just be sure not to select the partition containing the version of Windows currently installed on your system, as two versions of Windows can’t be installed on the same partition.

Windows will install normally, but it’ll install alongside the current version of Windows on your PC. Each version of Windows will be on a separate partition.


Choosing Your OS and Modifying Boot Settings

When the installation is finished, you’ll see a boot menu every time you boot your computer.Use this menu to select the version of Windows you want to boot.

Depending on which versions of Windows you’re using, the screen will look different. On Windows 8 and newer versions of Windows, it’s a blue screen with tiles with the title “Choose an operating system.” On Windows 7, it’s a black screen with a list of operating systems and the title “Windows Boot Manager.”


Either way, you can customize the boot menu’s settings from within Windows itself. Open the Control Panel, click the System and Security option, click the System icon, and click Advanced System Settings at the left side of the window. Select the Advanced tab and click the Settings button under Startup & Recovery. You can choose the default operating system that boots automatically and select how long you have until it boots.


Dual Booting Explained: How You Can Have Multiple Operating Systems on Your Computer


Most computers ship with a single operating system, but you can have multiple operating systems installed on a single PC. Having two operating systems installed — and choosing between them at boot time — is known as “dual-booting.”

Google and Microsoft ended Intel’s plans for dual-boot Windows and Android PCs, but you can install Windows 8.1 alongside Windows 7, have both Linux and Windows on the same computer, or install Windows or Linux alongside Mac OS X.

How Dual-Booting Works

Your computer’s operating system is generally installed on its internal hard drive. When you boot your computer, the BIOS loads the boot loader from the hard drive and the boot loader boots the installed operating system.
There’s no limit to the number of operating systems you he installed — you’re not just limited to a single one. You could put a second hard drive into your computer and install an operating system to it, choosing which hard drive to boot in your BIOS or boot menu. You could also boot an operating system — like a live Linux system or a Windows To Go USB drive — from external storage media.
Beginner Geek: Hard Disk Partitions Explained
Even if you only have a single hard drive, you can have multiple operating systems on that hard drive. By partitioning the drive into several different partitions, you can have one partition for one operating system and another partition for another operating system, splitting the drive between them. (In reality, many operating systems use multiple partitions. The point is you’re devoting part of the drive to one operating system and part of the drive to another.)
When you install a Linux distribution, it typically installs the Grub boot loader. Grub loads instead of the Windows boot loader at boot time if Windows was already installed, allowing you to choose the operating system you want to boot. Windows also has its own boot loader, which can be used to select between different versions of Windows if you have more than one installed.

Why Bother Dual-Booting?

Different operating systems have different uses and advantages. Having more than one operating system installed allows you to quickly switch between two and have the best tool for the job. It also makes it easier to dabble and experiment with different operating systems.
For example, you could have both Linux and Windows installed, using Linux for development work and booting into Windows when you need to use Windows-only software or play a PC game. If you like Windows 7 but want to try out Windows 8.1, you could install Windows 8.1 alongside Windows 7 and choose between the two at boot time, knowing you’ll always be able to go back to Windows 7. If you’re using a Mac, you can have Windows installed alongside Mac OS X and boot into it when you need to run Windows-only software.
You could use virtual machine software instead of setting up a dual-boot system, but a dual-boot system lets you actually use both operating systems on your hardware at full, native speed. You don’t have to deal with the overhead of a virtual machine, which is especially bad when it comes to 3D graphics. The downside is you can only use one of your installed operating systems at a time.


Switching Between Operating Systems

If each operating system is installed to a separate drive, you could actually switch between both by selecting a different drive as your boot device every time you boot. This is inconvenient and you’ll probably have two operating systems installed on the same drive, so that’s where a boot manager comes in.
Switch between your installed operating systems by rebooting your computer and selecting the installed operating system you want to use. If you have multiple operating systems installed, you should see a menu when you start your computer. This menu is typically set up when you install an additional operating system on your computer, so you won’t see if you just have Windows installed or just have Linux installed.


Setting Up a Dual-Boot System

Setting up a dual-boot system is fairly easy. Here’s a quick overview of what to expect:
  • Dual Boot Windows and Linux: Install Windows first if there’s no operating system installed on your PC. Create Linux installation media, boot into the Linux installer, and select the option to install Linux alongside Windows. Read more about setting up a dual-boot Linux system.
  • Dual Boot Windows and Another Windows: Shrink your current Windows partition from inside Windows and create a new partition for the other version of Windows. Boot into the other Windows installer and select the partition you created. Read more about dual-booting two versions of Windows.
  • Dual Boot Linux and Another Linux: You should be able to dual-boot two Linux distributions by installing one first and then installing the other. Choose to install the new Linux system alongside your old Linux system. Resize your old Linux partitions in the installer and create new ones to make space if the installer won’t do this autoamtically.
  • Dual Boot Mac OS X and Windows: The Boot Camp utility included with Mac OS X allows you to easily set up a Windows dual-boot system on your Mac.
  • Dual Boot Mac OS X and Linux: Boot Camp doesn’t allow you to set up a dual-boot Linux system, so you’ll need to do a bit more footwork here. Follow our guide to installing Linux on a Mac for more details.

You aren’t limited to just two operating systems on a single computer. If you wanted to, you could have three or more operating systems installed on your computer — you could have Windows, Mac OS X, and Linux all on the same computer. You’re only restricted by the storage space available on your computer and the time you want to spend setting this up.